Philips 3000 Series Wet & Dry Electric Shaver S3143/00
312/3692

Product details
- Brand: Philips
- Catalogue number: 312/3692
- Manufacturer's number: 8.72E+12
Philips Personal Care Support
 UK:
UK:
 Eire:
Eire:
Email me this page
Enter your email address to have this page emailed to you *
FAQs
If you're a new user of the Philips Shaver or have replaced the shaving heads, your skin may need to adapt, potentially causing slight irritation initially. Allow a two to three-week adjustment period. Use a gentle moisturizer or aftershave lotion to reduce irritation. Follow the tips below for optimal results and to avoid discomfort:
• Ensure your skin is clean before using the Philips shaver.
• Keep the shaving unit in full contact with your skin.
• Apply gentle pressure and move the unit slowly in circular motions.
• Pre-trim long or difficult hair.
• Allow your skin time to recover between sessions.
• When cleaning, remember that the shaving heads, cutter, and guard are matching sets; incorrect placement may delay optimal performance.
Air travel
Airlines have varying requirements for battery-operated products. Always verify your airline's specific rules before traveling. Most allow lithium-ion batteries under 100-watt hours in hand luggage, which includes all Philips shavers. If unsure, check with your airline.
Charging abroad
When charging Philips shavers abroad, ensure the power supply matches the charger or plug adapter specifications, typically found on the plug/adapter. If the only difference is the number of pins or plug shape, a standard travel plug adapter can be used with your home plug/adapter.
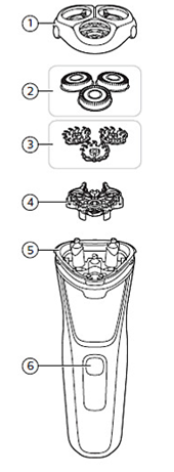
To maintain your Philips shaver, know how to remove and reinstall the shaving heads for routine deep cleaning and replacement. Consult the user manual for specific instructions, as images may vary by model.
|
|
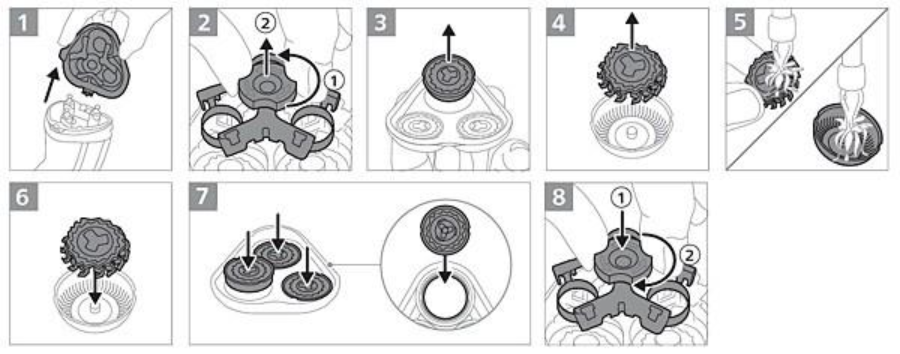
Disconnect the shaver from the plug and ensure it's off before starting.
1. Remove the shaving head holder from the handle.
2. Twist the dial anticlockwise to unlock the retaining frame (1), then lift it (2).
3. Lift the shaving heads from the holder.
4. Remove the cutters from the guards, ensuring not to mix them up.
5. Rinse each cutter and guard with warm water, then place each cutter back into its guard.
6. Hold the shaving head holder upside down and reinsert the shaving heads with the guards' tops facing down.
7. Place the retaining frame on the shaving heads with the dial up (1), then twist the dial to lock it (2).
8. Reattach the shaving head holder. Let cleaned shaving heads air dry before your next shave. Rinse out any hair build-up in the hair chamber with running water.
After replacing the shaving heads
After replacing the shaving heads of your Philips shaver, you may feel mild skin discomfort. Allow 21 days for your skin to adapt. If you notice redness or irritation, apply a mild, alcohol-free lotion to soothe your skin.
We're dedicated to enhancing the longevity of Philips shavers, minimizing environmental impact, and improving user experience.
If your shaver fails during the warranty period, please click here to request a repair or exchange and check warranty status. Since most Philips shavers are waterproof, we advise having any issues diagnosed by an authorized Service Centre to avoid compromising its waterproof quality, which could cause damage or injury.
Charging your Philips shaver after every shave is unnecessary but allowed. Philips shavers with lithium-ion batteries can handle daily charging without significant harm. Many models feature a low battery indicator to signal when charging is needed.
If you're a new user of the Philips shaver or have replaced the shaving heads, your skin needs time to adapt, which may cause slight irritation initially. Allow a two to three-week adjustment period. To minimize irritation, use Aloe Vera cream, a gentle moisturizer, or an alcohol-free aftershave lotion. Also, consider giving your skin recovery time between shaving sessions.
Follow these tips for the best results with your Philips shaver and to prevent discomfort:
- Ensure your skin is clean before shaving.
- Keep the shaving unit in full contact with your skin.
- Apply gentle pressure and move the unit slowly in circular motions.
- Pre-trim long or difficult hair.
- Allow time for your skin to recover between sessions.
- When cleaning, remember that the shaving heads, cutter, and guard are matching sets; mixing them may delay optimal performance.
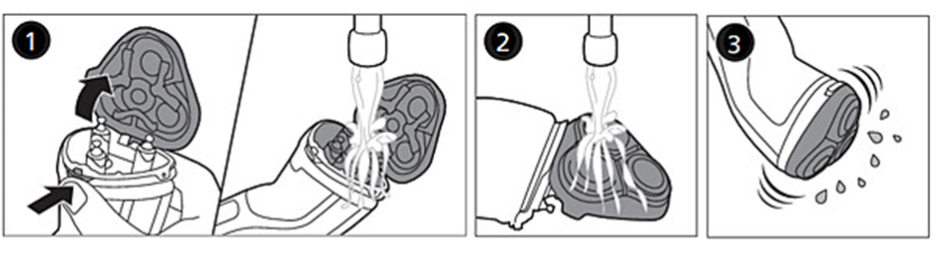
Cleaning after every shave
Clean your shaver after each use to reduce hair and debris build-up. Turn on the shaver and rinse the shaving unit under warm water, then turn it off. Depending on the model, open the shaving unit by pressing the release button or pulling it off to rinse inside. Let everything air-dry before your next shave.
Thorough cleaning
To clean your shaver thoroughly, you'll need to remove the shaving heads.
Please refer to the Frequently Asked Question "How do I remove the shaving heads of my Philips Shaver?" or the user manual for detailed instructions for your shaver.
Clean the cutters and guards separately after removing the shaving heads. Each cutter and guard is unique, so avoid mixing them up. Allow all parts to air dry before your next shave.
Cleaning attachments
If your Philips shaver has trimmer, clean them under warm water and air-dry before use. Tip: For best performance, lubricate the trimmer's teeth with mineral oil every six months.

If you are unable to resolve the issue, then please either call us using the phone number on this page OR click HERE to arrange a return or exchange.
Questions & answers
How-to videos
-
How to clean the Philips Shaver S1000 - S3000


Returns policy
If you need advice or support for your product, please in the first instance contact the support provider using the number on this support page.
If you still need to return your product then please visit our most up to date returns policy here.