AURA Carver Mat 10.1 Inch Digital Photo Frame - Black
320/3361

Product details
- Brand: aura
- Catalogue number: 320/3361
- Manufacturer's number: AF905-MBLK
Aura Support
Email me this page
Enter your email address to have this page emailed to you *
Useful links
Online supportFAQs
In most cases, your Aura app will show this message when the frame is turned off, so there is usually no network issue problem involved. Simply power on the frame (if you are the owner) and make sure that the frame is connected to the WiFi network.
In order for you to connect your frame to a WiFi network, your frame first needs to be paired - via Bluetooth - to your smart device. This is done by inputting the 4-digit code into the Aura app. (You DO NOT need to pair with the frame via Bluetooth in your devices settings. Only via the Aura app)
If you can’t see the 4-digit code, here is what you need to do:
If the screen is black, try unplugging and replugging the power cord from the back of the frame. If this still does not help, try plugging the frame into a different outlet.
This can happen when the Aura app is unable to connect to the frame, which usually occurs during the Bluetooth pairing stage (before you connect the frame to the WiFi network).
Here’s what you need to do:
Close your Aura app, reboot the frame, and ensure your device's Bluetooth is turned on.
For Android devices, you need to ensure Location Services are turned on for setup.
For iOS devices, you need to ensure the Bluetooth Privacy permission is enabled for the Aura app.
This will happen if the your Aura frame cannot sense your WiFi network. In the Aura app, please back out of the connection screen and restart the process. In some cases, this can take 2-3 attempts until the network is displayed in the app.
Here’s what you need to do:
First, unplug your router and plug it back. Once the router has fully rebooted(may take up to 10 min), reboot your frame and go through the connection process again.
This message implies that your app is unable to reach our servers. This is usually related to a weak home network or a firewall blocking the access.
Here’s what you need to do:
Check that your smart device (that runs the app) is connect to WiFi or cellular internet and that you can access the interest from your phone's web browser.
If your device cannot access the internet, turn off the WiFi on your device and turn it on again.
Check that your phone is connected to the right network.
Reboot your phone if none of the above steps have helped.
Then, check if other devices in your home are able to connect to the internet to rule out a general problem (e.g. internet outage) or settings issue with your router.
If you are using a WiFi connection at a business or in a public place, you may be experiencing content restrictions or enhanced security settings that are blocking https port 443. Please contact your IT department for help
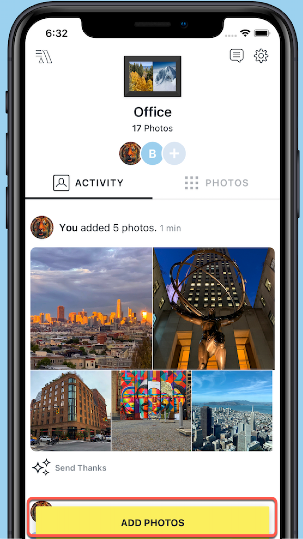
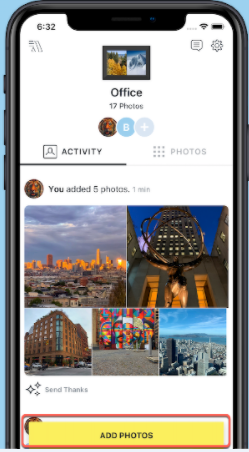
First, open the Aura app and tap on the "A" icon (top left corner) to view the home screen that lists all the frames that you own or contribute to. Select a frame (here: "Office") and scroll down to tap the 'Add Photos' button:
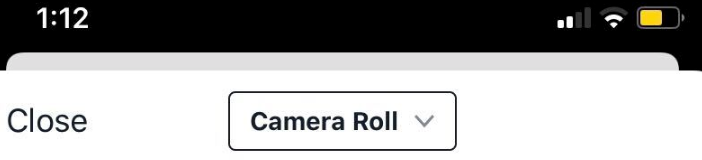
The app will now direct you to the photo selection screen that by default shows all compatible photos/videos in your smart device's library (unless you only granted the iOS app limited photo permission).
The photo selection screen is called "Camera Roll" on iOS and "Photos" on Android devices.
Here is the simple 4-step process:
- Confirm the photo/videos source (e.g. your device library or a special album).
- Tap on the photo(s)o or video(s) that you want to send to your frame(s).
- Select one - or multiple - frames that you want to send the photo(s) to.
- Tap on the yellow "Add xx Photos" button to send the photos on their way!
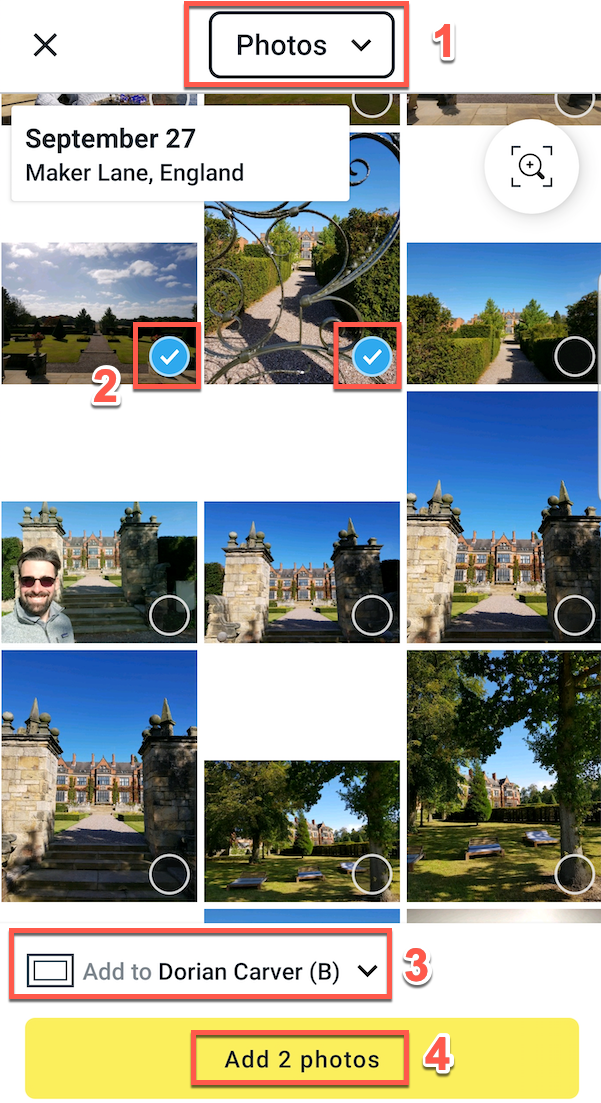
| Note: Uploaded photos/videos are instantly shown in your app (as an upload 'intent') but depending on your WiFi and the number of photos it can take a while (up to a few days) until the photos reach our servers and your frame. Find out more in this article. |
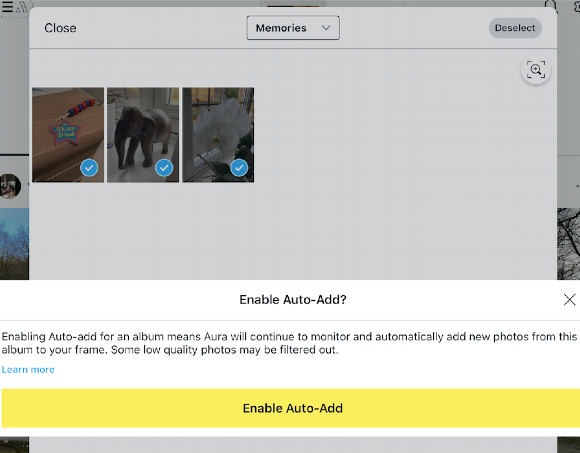
When you select an entire album to be added to your Aura frame, you will be prompted with a message asking if you want to “Enable Auto-Add?”
Auto-Add
Auto-Add is beneficial for albums that are continually updated, such as shared family albums. Enabling Auto-add for an album means Aura will continue to monitor and automatically add new photos from this album to your frame. Some low-quality photos may be filtered out.
Just pick any album from your photo library, tap "Select All" and then turn on "Auto-Add". Aura will add all of the photos in that album and will continually watch for new ones and add those, too. Videos are not currently supported. Aura may skip some of the photos, especially those that are too grainy or blurry to look great on your frame.
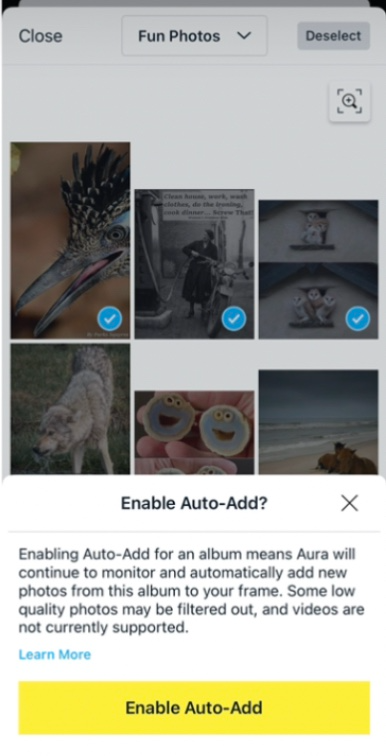
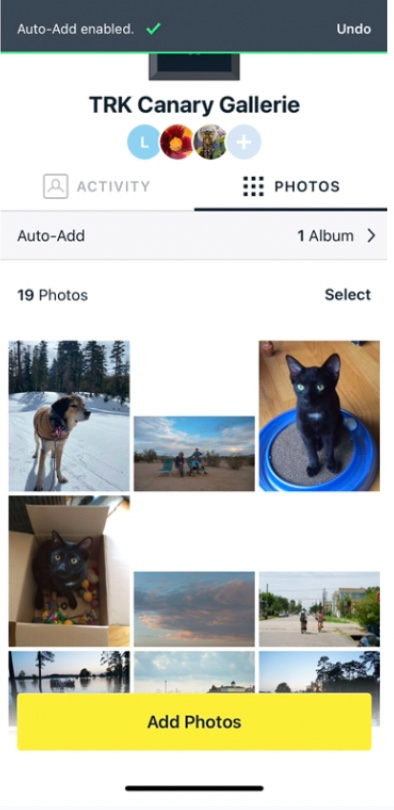
Tip: This also works with shared albums from iCloud or Google Photos, so you can easily update your frame with photos from your whole family!
Note: Uploading Albums from your computer is not possible, as explained in this article.
There are slight differences in the Aura App between Google Photos and Apple Photos:
- For example, there is no feature for Auto-Add using a Google “Favourites” album. All other Google albums are supported.
- If you delete photos from an Apple Auto-Add album within the Apple Photos app, the photos will automatically be removed from the Aura frame.
- If you delete photos from a Google Auto-Add album, the photo will remain on your Aura Frame. If you want the Google photo deleted from your Aura Frame, refer to this FAQ: How can I remove Photos & Videos from my Frame? For more information on Google Photos and Aura, visit: Using Google Photos with Aura
If you add an album without turning on Auto-Add, there is no easy way to remove the album photos in Aura. Only an Auto-Added album can be removed by selecting the album, as non-Auto-Added albums are loaded into your general photo collection and shuffled with your other content as individual photos. Auto-Add is the only instance in which photos are stored separately in the Aura App. This does not mean that Auto-Add can be used as a separate playlist.
Select-all
The "Select All" function allows you to add multiple photos and videos to your frame simultaneously. Not enabling "Auto-Add" ensures there is no filtering of your photos. The photos selected will appear in the PHOTOs tab of the Aura App as if you have manually added each photo and video.
- Open the Aura App, tap on the "A" setting to select your frame, and scroll down to tap on the yellow "Add Photos" button:
- Tap on the "Camera Roll" (iOS) or "Photos" (Android) icon on the top to change from Individual Photo to Album selection view.

- Your Aura app will now display all existing albums on your smart device (unless you limited the Aura iOS app permissions):

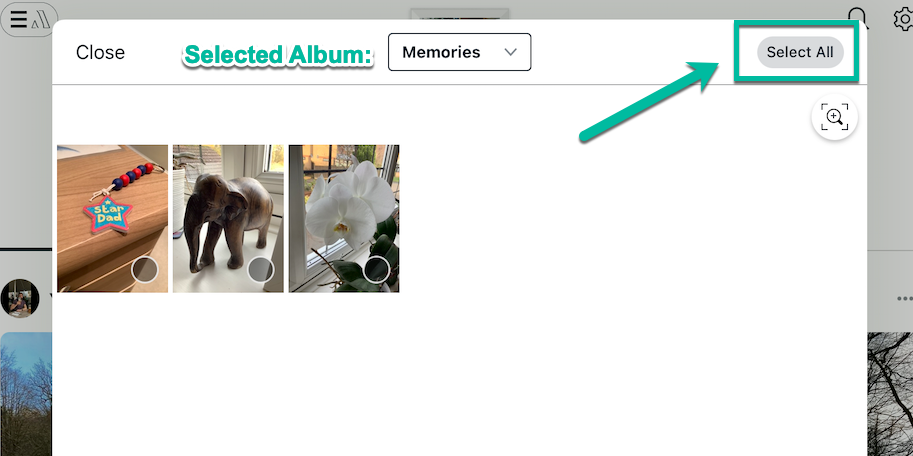
- Select an album of your choice and tap "Select All" to select all the photos that are currently in that album.
- You will now be offered to enable "Auto-Add" which will effectively sync this album with your frame:
- Select if you want to add (or sync) this album and confirm by tapping on the yellow "Add Album" button.
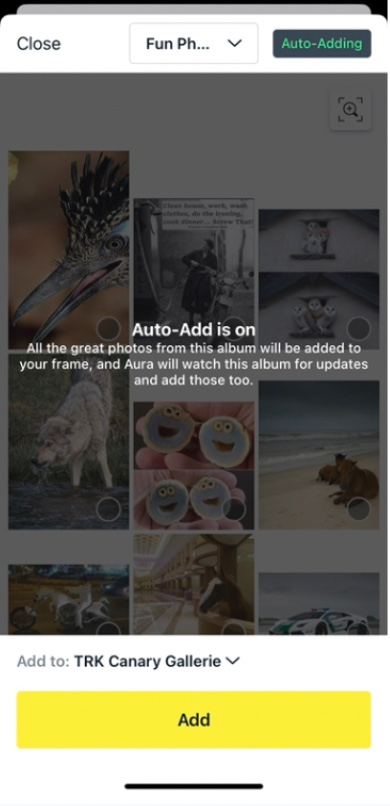
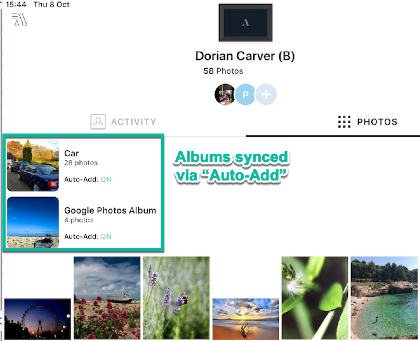
- If you enabled Auto-Add, your synced album will now be shown in the top section of your frame's photo section:
Important:
|
How can I remove an 'Auto-Added' (= synced) Album from a frame?
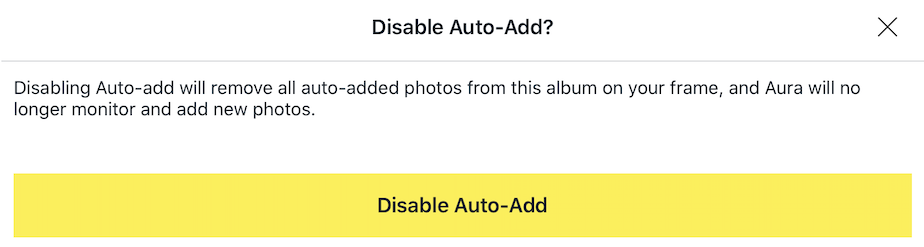
At any time, you can disable the "Auto-Add" feature to un-sync a particular album from your frame. The app will then offer you to:
- Un-sync the album but keep already uploaded media on your app/frame
- Un-sync the album and also delete the media from your app/frame (but not from your device's library)
Here is how you can disable 'Auto-Add' for individual albums:
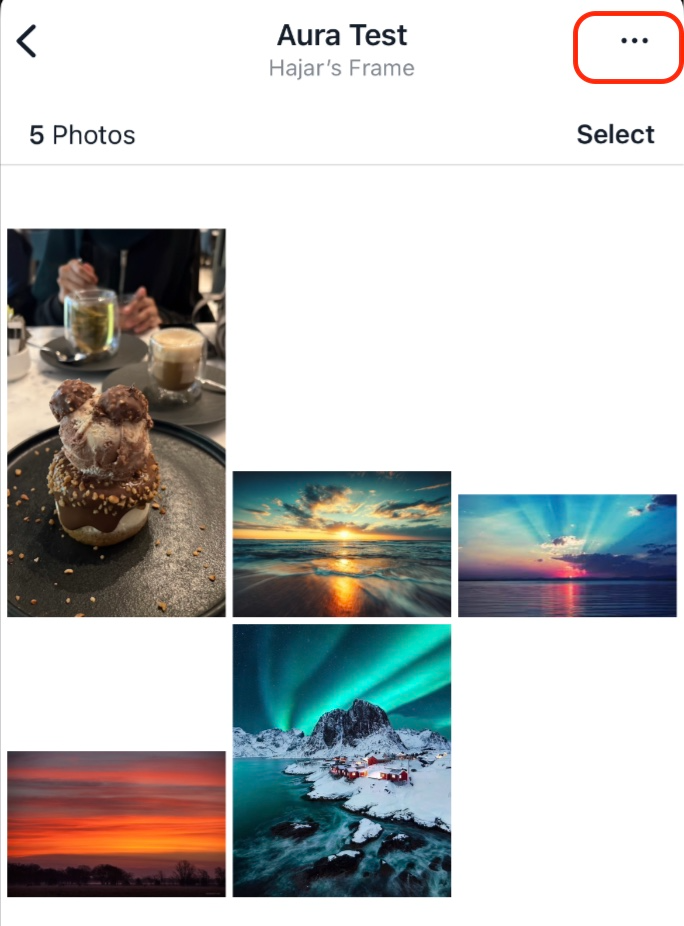
Open the Aura app and select the frame that you want to un-synch an album from.
In the frame view, tap on the album that you want to un-sync.
Click on the three dots in the top right corner:
Disable Auto-Add and choose whether you want to remove or keep already uploaded photos from that album:
- Open the Aura app.
- Tap onto the frame in which you would like to invite members.
- Tap on "Add Members" or tap the settings icon on the top right.
- In the blank field underneath "Invite Members" enter the email or phone number of the person you would like to invite to the frame. You can also select from your contacts by clicking on the icon to the right.
- Once you have entered the phone number or email address, tap the "Send" button below.
- If you choose to send an invitation via text message, a pre-drafted invitation will appear in your message center. Click to send before being redirected back to the Aura app to continue sending invitations.
- Initially, your invitations will appear below "Pending Invites." Click the icon to the right of each invitation to "resend" or "cancel" the invitation. Once the invitation has been accepted the email address will be listed under "Frame Members."
Note: Invited frame members are able to see all uploaded photos and control the frame settings. Find out more information HERE. Note: Frame invitations expire in 30 days, for expired invitations, simply resend the invitation (step 7 above). |
- Search the Google Play or Apple App Store to find and download the free "Aura Frames" app. Alternatively, you can use the online web uploader to set up your account and to accept the invite.
- Create your own Aura account using your name, email address and a secure password
- Locate the invitation that was received via text message or email. Click the link to join the frame which will redirect you to the installed Aura app on your device.
- Accept the pending invitation and enjoy sharing wonderful memories.
- Open the Aura app to the Home Screen
- Tap on the name of your frame
- Tap the settings wheel in the top right corner of your screen
- Tap on "Members"
- Tap the email address of the person you want to remove from the frame.
- Tap the icon in the top right (three small dots) and select "Remove from Frame"
| Note: This will also remove any of the photos that this member had added to your frame |
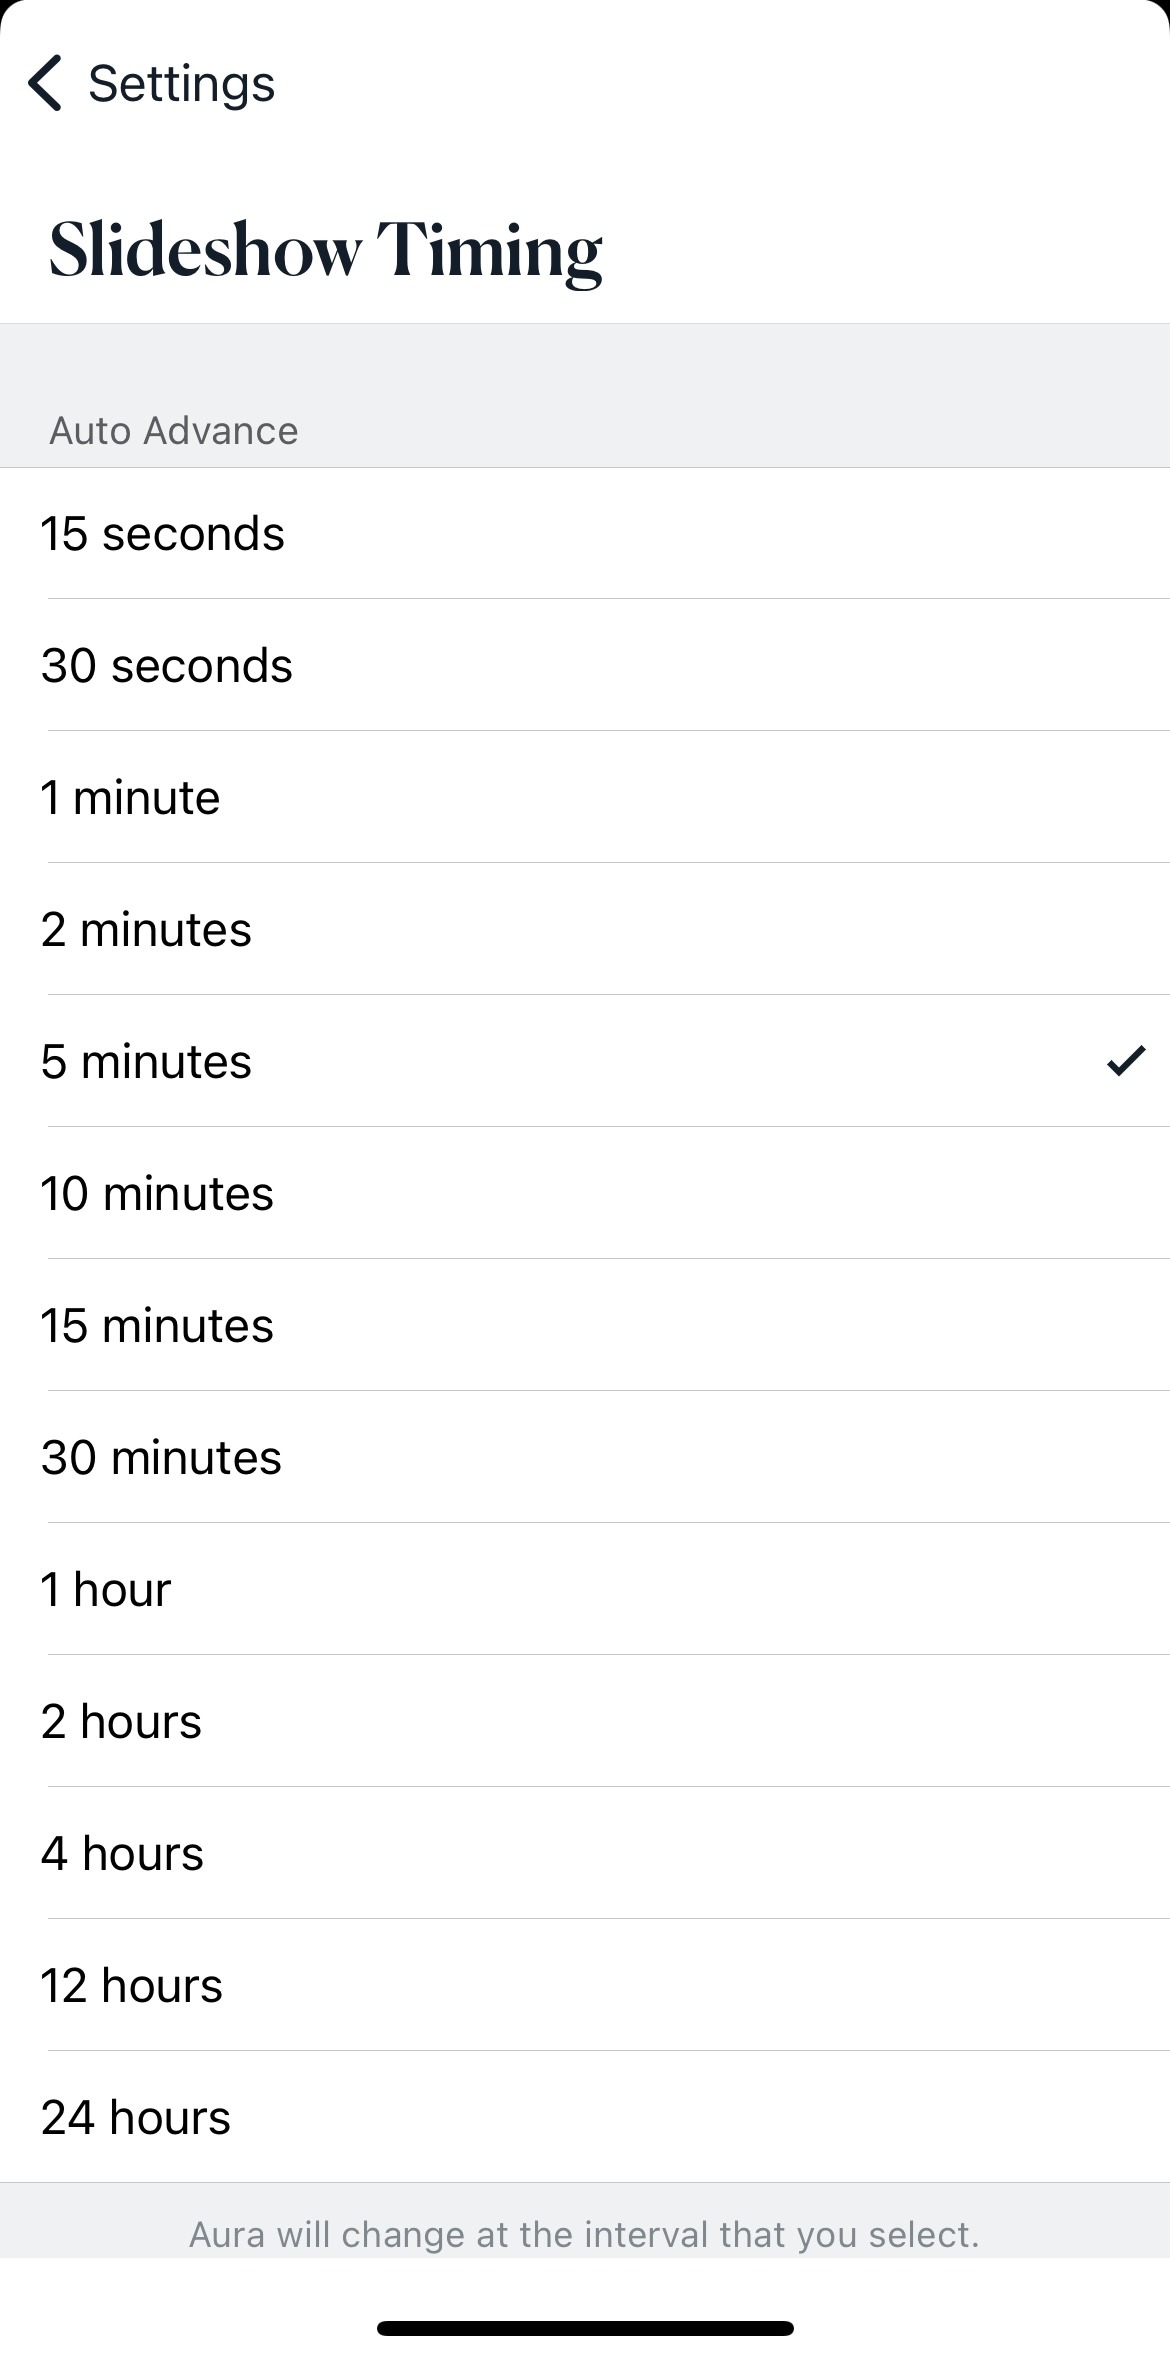
Follow the steps below to set a timed slideshow for your frame:
- Open the Aura app to view your home screen.
- Tap on the "A" in the top left corner, then select your frame.
- Tap the "Settings" icon on the top right.
- Tap "Timing" underneath Slideshow.
- Select the speed at which your photos will change on the Aura.
- You can now exit the settings of the app. Your Aura will display pictures at the interval speed selected.
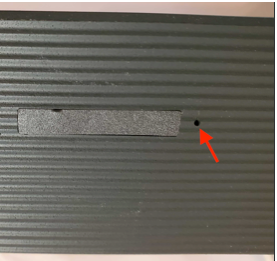
Each Aura frame comes with a special reset hole that you can find on the bottom or the back of the frame, usually near the power cable adaptor. For some frames (Smith, Sawyer), you may have to remove the stand to find it.
Carver/Buddy Carver Luxe

Mason Luxe Sawyer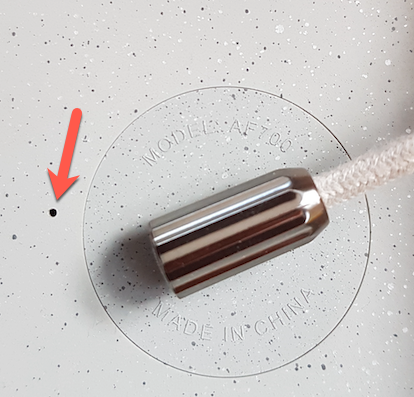 Walden
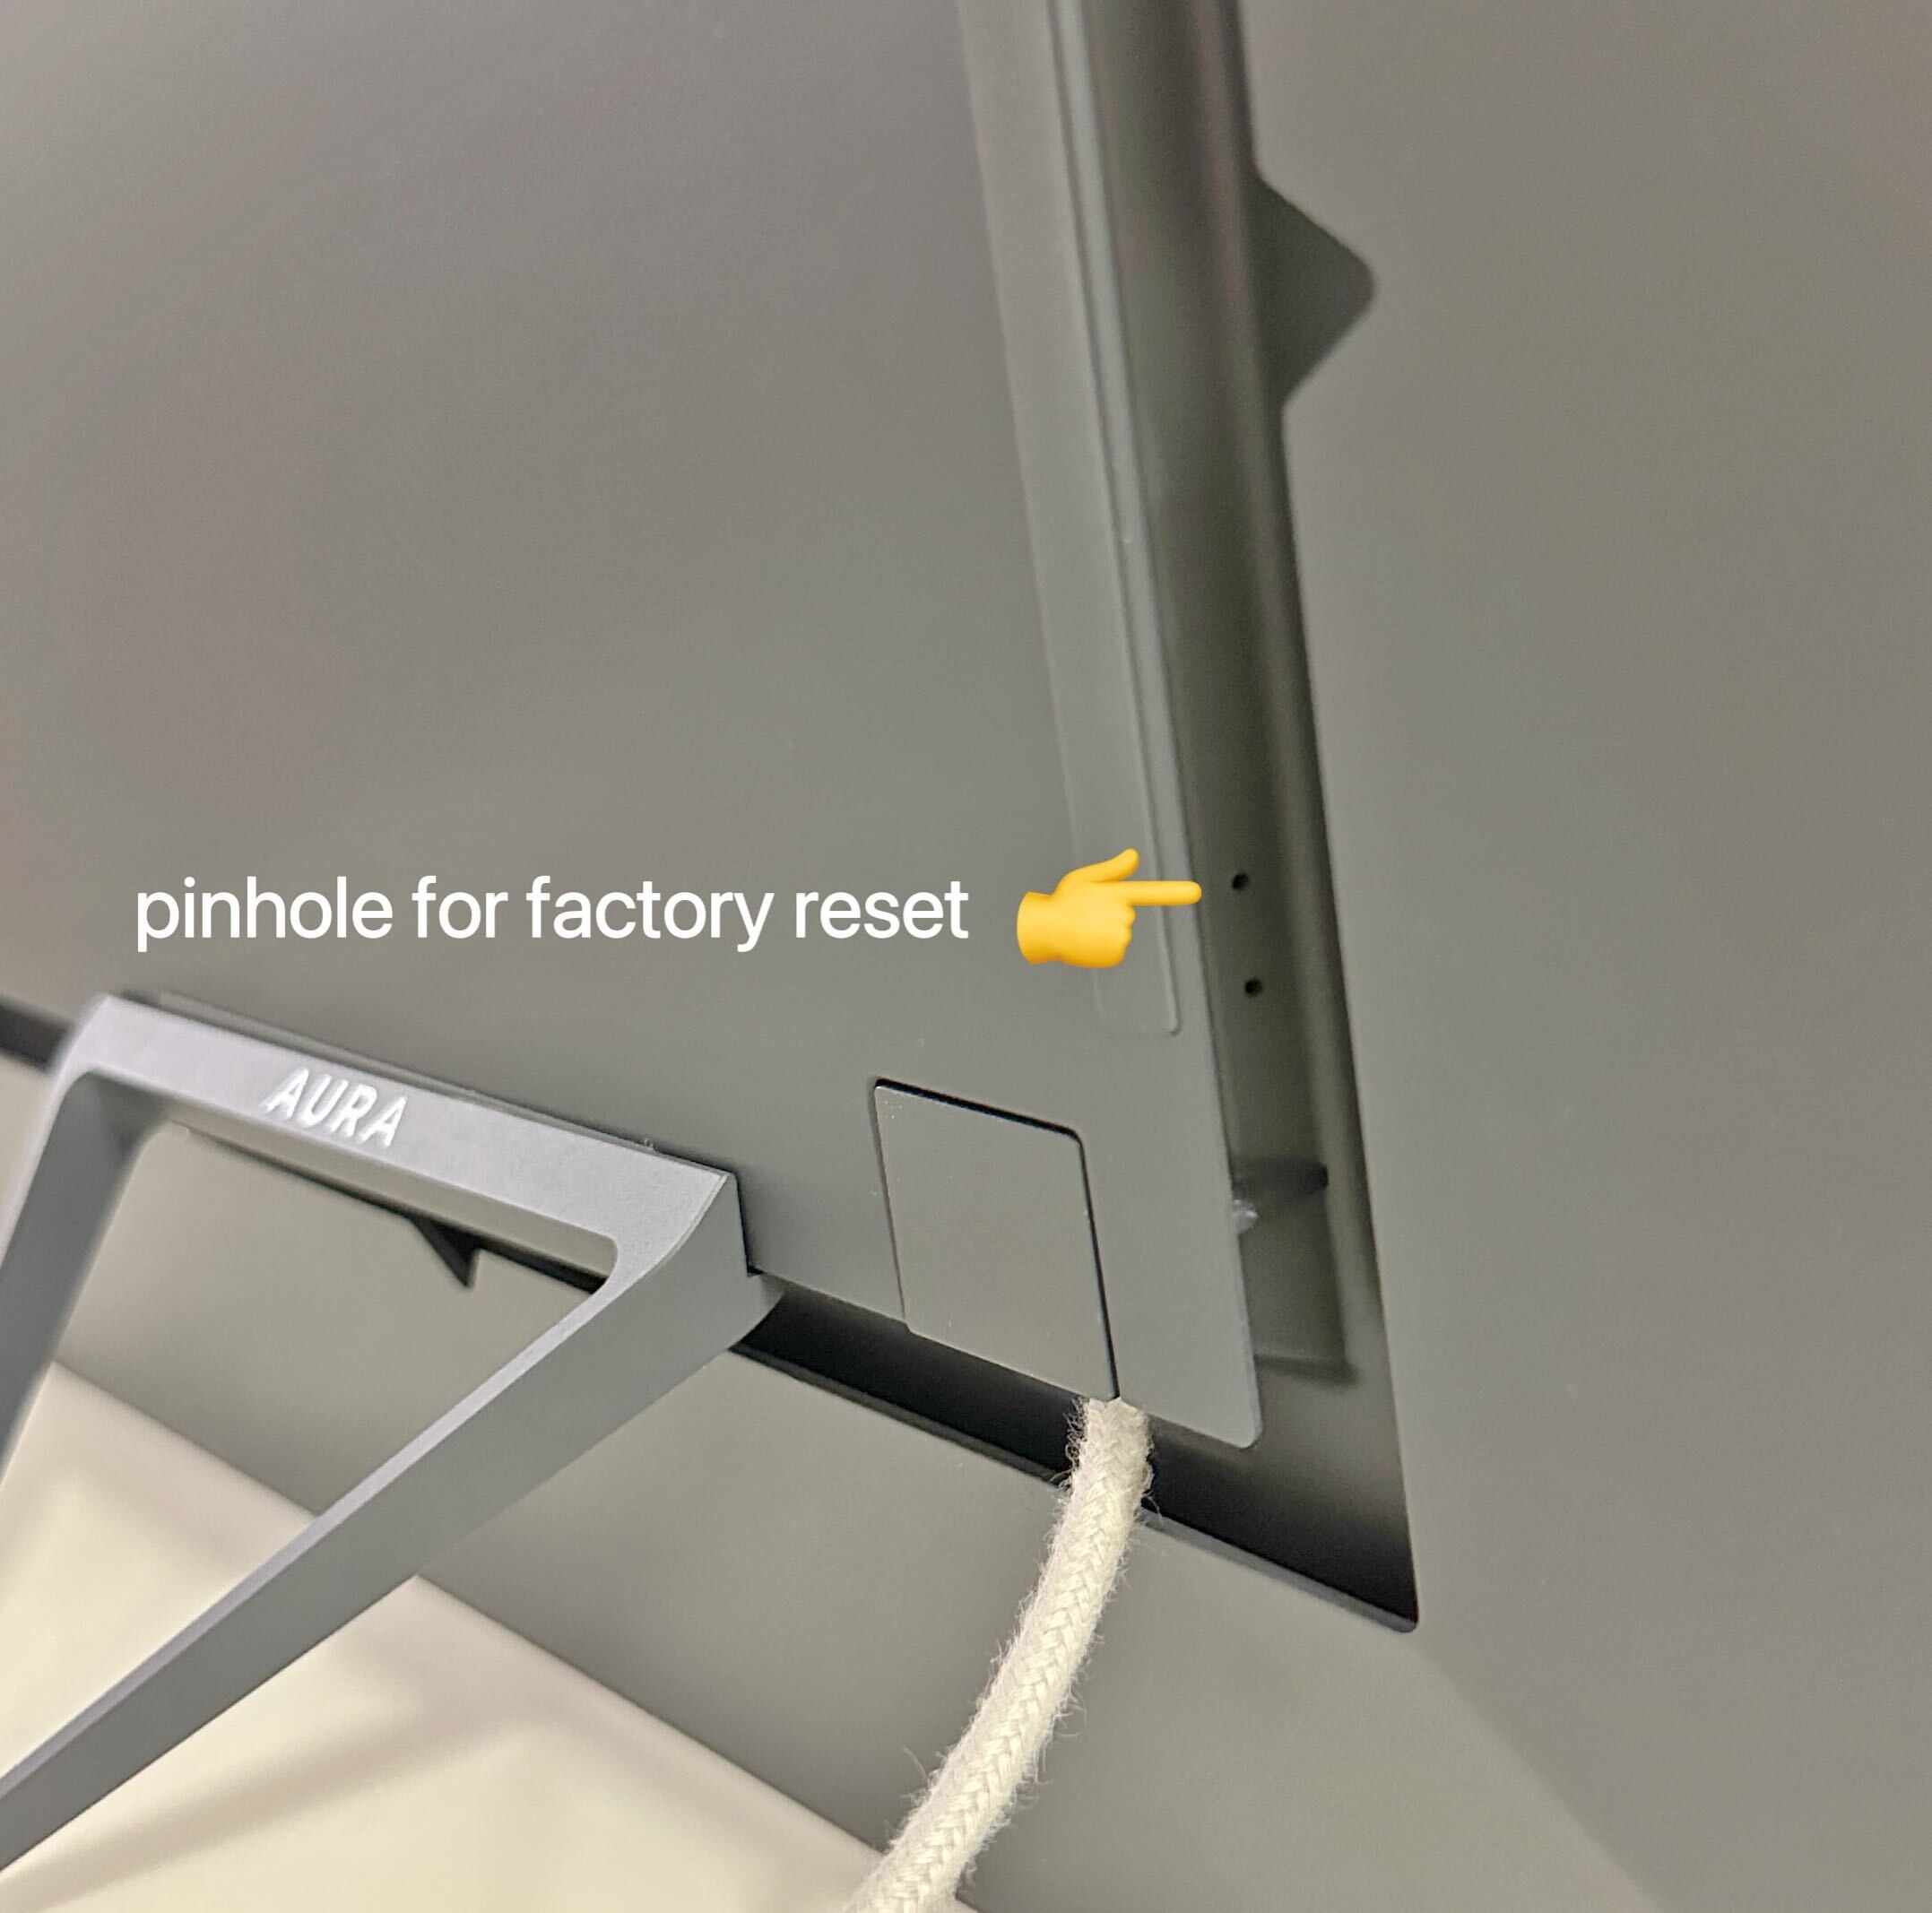
Once you have located the reset pinhole, please keep the frame connected to power and follow these steps:
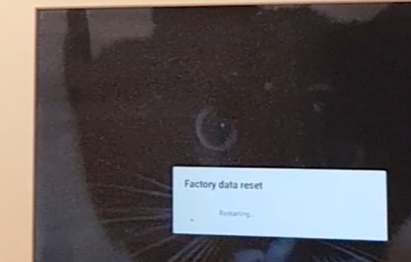
- Press a small paperclip into the reset hole until you hear a soft click or feel that the button has been pressed.
- Maintain the pressure for 10-15 seconds until the screen goes dark and you see a "Factory Data Reset" message on the display.
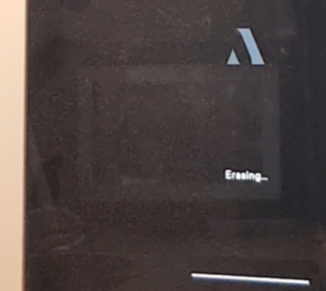
- You can now withdraw the paperclip while the frame resets itself and displays an "Erasing" message.
- Once completed, the frame will turn on again and display the Aura stock image with the 4-digit Bluetooth pairing code. The actual image may vary by model but the code is the actual confirmation that the reset was successful.
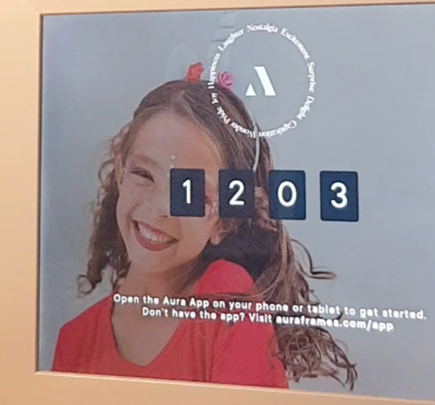
- If you didn't see the "Factory Data Reset" or "Erasing" message and your frame doesn't display the 4-digit code either, please repeat the process. You may need to try this multiple times.
Questions & answers
How-to videos
-
How to Set Up Your New Aura Frame
-
How to Add Albums to Your Aura Frame
Similar products

Returns policy
If you need advice or support for your product, please in the first instance contact the support provider using the number on this support page.
If you still need to return your product then please visit our most up to date returns policy here.